Crocheted Vest for Teddy Bears (Build a Bears, etc) – pattern

It has been a truly long time. No explanation, no excuses. Just — here’s a pattern I made!

These Build a Bears of mine needed a simple school-uniform-type vest. I’m still much better at crochet than knitting, and I couldn’t find something that was quite what I wanted, so here’s what I created.

It’s fairly easy to adjust (the black bear, Baz, is a bit bigger than the other, Simon; and I made his vest a little longer in the body), see the notes in the pattern.

2016 05 30_0016

vests

2016 05 30_0010

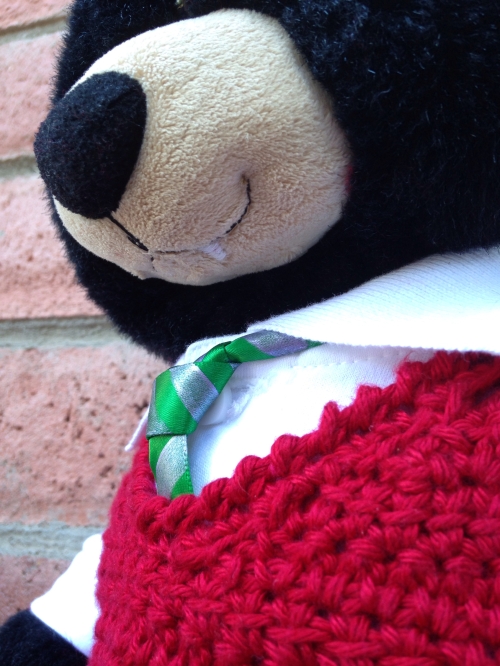
crab stitch edging (and vampire teeth)
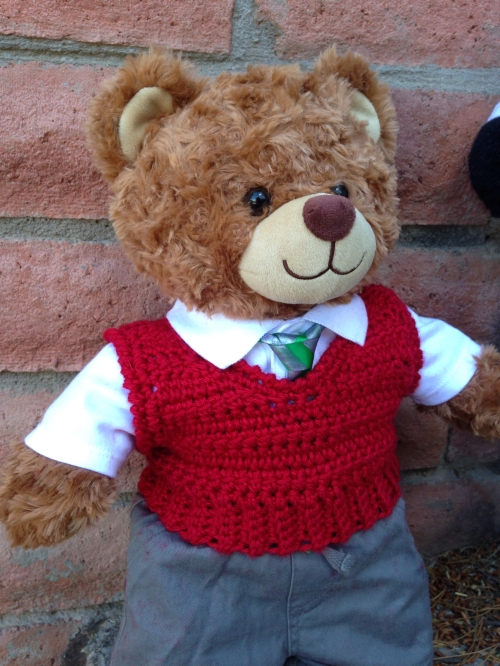
2016 05 30_0008

ready for adventure

Here’s the pattern!

Crocheted Vest for Teddy Bears (Build a Bears, etc)

Materials:

  • H hook (5mm)
  • Yarn (I used Yarn Bee “Hint of Silk,” China Silk (red), (bamboo & silk yarn) – used just under one full skein, which is 3 oz/85g,130 yds/119m)
  • Yarn needle, scissors, etc.


Abbreviations/Stitches Used:

  • Ch – chain
  • Sk – skip
  • St – stitch
  • Sc – single crochet
  • Tbl – through back loop
  • LDC – linked double crochet
  • LDC 2tog – linked double crochet 2 together (decrease)
  • Crab stitch edging


LDC

  1. One loop on hook.
  2. Insert top to bottom into horizontal bar of previous stitch (or 2nd chain of ch3), yo, draw through. (2 loops on hook.)
  3. Insert hook into next stitch, draw up loop, yo, draw through 2 loops, yo, draw through remaining 2 loops.


LDC 2tog (decrease)

  1. One loop on hook.
  2. Insert top to bottom into horizontal bar of previous stitch, yo, draw through. Two loops on hook.
  3. Insert hook into next stitch, draw up loop. Insert hook into next stitch, draw up loop (4 loops on hook).
  4. YO, draw through two loops, yo, draw through remaining three loops.

(LDC 3tog is similar, but insert hook into an additional stitch in step 2, and draw through three loops at a time in step 4.)


Crab Stitch

At the end of row of sc, do not turn — CH 1, skip the stitch directly to the RIGHT and reverse single crochet (rev SC*) into each SC, ending with a sl  st in the turning chain of the previous row. Fasten off.

*rev SC (worked from left to right): Insert hook in next stitch to the right, yarn over, pull loop through, yarn over, pull through both loops on hook.


Notes:

Adjustments are fairly simple, adding rows in the body, or even starting with a few more rows of ribbing and body stitches.

When adjusting, keep an eye out to match the pattern of alternating right and wrong side rows of LDC.

Figuring out the front: total stitch count, subtract 9 (or 10), divide that by 2. Be sure to put the decreases (after row 2) on the v-neck side.


Bottom Ribbing

Ch 6

1 – Sc in 2nd ch from hook and in each ch across. (5 sc)

2 – Ch 1, turn. Sc tbl across.

Repeat row 2 till approx. 17” (approx 54 rows). Fasten off.


Body

Attach to end, ch 1. Sc evenly to the end. (Approx 54 sc)

Ch 3. LDC in each sc to the end. (This is the right side (RS) of work.)

Repeat previous row till body measures approx.1.5” from top of ribbing. (Approx 4 rows.) 54 st, fasten off, leave long tail for sewing side seam later.


Back

Turn work (match right/wrong sides of stitches)

1 – Sk first 2 sts. Join yarn in next st, ch 3 (counts as first stitch), LDC 21x (22 st)

2 – Ch 3, turn, LDC 2tog, LDC across, LDC 2tog at end (20 st)

3-4 – Ch 3, turn, LDC across


Shoulders

5 – ch 3, turn, LDC 4 times, fasten off (5 st)

Attach yarn with sl st and do the same in the last five st on other side.


Front

1 – sk 5 st from back (other armhole). Ch 3, LDC across, till 3 st from end (22 st)


(decreases rows 3-5 on side of v-neck)

Left front

2 – ch 3, turn, LDC 2tog, LDC 6x, LDC 2tog (9 st)

3 – ch 3, turn, LDC 2tog, LDC 6x, (8 st)

4 – ch 3, turn, LDC across, LDC 3tog (6 st)

5 – ch 3, turn, LDC 2tog, LDC across (5 st)

6 – ch 3, turn, LDC across


Right front

Attach in middle (matching RS/WS of stitches) with sl st

2 – ch 3, turn, LDC 2tog, LDC 6x, LDC 2tog (9 st)

3 – ch 3, turn, LDC 6x, LDC 2tog (8 st)

4 – ch 3, turn, LDC 3tog, LDC across (6 st)

5 –  ch3, turn, LDC across till last 2 st, LDC 2tog (5 st)

6 – ch 3, turn, LDC across


Sew shoulders, and side seam.


Edging

1 – Attach yarn at bottom of armhole, ch1, sc evenly around armhole. Sl st to first sc.

2 – Ch 1, crab stitch around.

Repeat for other armhole, and around neckline.

Weave in ends.

everyday April album

So, I love Stacy Julian’s book The Big Picture. Totally recommend it. Way back in April of 2007, I decided to try her “May Everyday” album project. (Except, well, in April.) I can’t seem to find a link to an example of her album online, or a similar one, though this blog post of hers has a similar concept, though the album is quite different.

April 2007. Do you know that was six years ago? It was also my 6th wedding anniversary that year. I’m planning to do this project again this April, 6×12 album again, using some of the Olive core kit from Project Life, as well as some of Becky Higgins’ page protectors. In theory, I do Project Life as well. (I say “in theory” because I don’t print photos at home, and so I end up having major “catch up” sessions most of the time. I wanted to slide photos in a bit more consistently this year but since we were away from home in January, I’m still not quite in the groove.) But I usually have a more weekly/monthly focus for that, where this project lets me get very intense and daily for just a manageable month.

Anyhow, I thought first I would share the old album with you…

photo
The sneak peak (not that sneaky, since it’s translucent) of the front.

Now, back in April of 2007, I didn’t have any 6×12 page protectors, or a 6×12 album either. But I did have a giant box of 12×12 page protectors from Costco. At the time, rather than order something special, I just took some of those and sewed them to the right size, punching the holes myself. As you can see here:
photo

I also decided to rig my own album. At the time, my husband was working at a company that manufactured poly-plastic folders, so I had him bring me a frost blue legal size one and I made my own cover out of it, with binder rings and ribbon and all.
photo

I started out with some super crappy (and cheap!) three-up divided page protectors from Michaels, but those quickly began to tear at the seams, so I switched them out for this type from Exposures Online, called 4×6″ Slim Pages, which are very nice, very sturdy.

photo
So, here’s the cover page, which I just recently finished. (It was complete except for the A – I’ve been looking forever for a large foam stamp that I know I have around somewhere… still haven’t found it so I used a printout instead.) I used papers from a matching kit I had (Chatterbox? who knows, this was six years ago!), and a general motif of paper strips, doodles and little flower brads.

photo
This page shows the basic format of the album (the same as Stacy J.’s): one side a 6×12 page with the date, the other a 3-up page protector with (generally) two photos and one spot for memorabilia of some kind. I will admit that though I set up all the pages in advance as SJ recommends, I didn’t always write on them on the day. Often I just took notes in my spiral notebook and then wrote on the page later. Perfectionism, what? But hey, it worked, and the simple format means that I did eventually finish it, though it was probably a few months later.

photo
Sometimes the memorabilia was actual memorabilia – like this program from Easter Sunday at church, or the ice cream packaging in the last picture. Sometimes it was receipts – and several times it was something I printed from online, like little sticker-type print outs of the Power Puff Girls and Mojo Jojo, because we were into that show at the time.

Some other things I included:


  • a map of our neighborhood, including Google Street View (partly because our car was on it)
  • a list of our favorite restaurants
  • a list of websites that I visit frequently
  • screenshot of our family blog
  • tags from the kids’ clothes
  • the magazines I was getting at the time – I cut the little pictures of them off the renewal cards and glued them onto a 4×6
  • a favorite poem at the time
  • the answers to an interview/quiz that I asked each family member (well, each one who could talk at the time). I plan to repeat those this year.
  • sometimes, just a third photo

Lots of variation – but I plan to recreate several of those things in the album this year, for the contrast.

photo
Hey look, those were the most awesome dollar store kites ever – a snap to fly.

photo
Tax info included on April 15th, of course. One of my favorite things in the album (not shown) is a printed pie chart of our spending that month – I was keeping track of everything in Quicken at the time. (Now I use YNAB – You Need A Budget – and I LOVE IT SO MUCH. But that’s a topic for another post.) I just love seeing what we spent our money on back then, at least some of it – how much our rent and utilities were, groceries, gas, how much I spent on paper vs. digital scrapbook supplies, etc. Really cool.

photo
The final page, with just a quote.

Normal day, let me be aware of the treasure you are. Let me learn from you, love you, bless you before you depart. Let me not pass you by in quest of some rare and perfect tomorrow. Let me hold you while I may, for it may not always be so. One day I shall dig my nails into the earth, or bury my face in the pillow, or stretch myself taut, or raise my hands to the sky and want, more than all the world, your return.
– Mary Jean Iron

People, I really love this album. It is so, so much fun to look through now. I flip the pages and just marvel at the differences between then and now – a couple of pages I traced my kids’ hands on, which I am totally going to do again this year, even if ten and eight seem a little old for hand tracing. Back then we were living in a little apartment in the city, we were in the midst of potty-training, we had a 4 and 2 year old. Now – we own a house for the first time, in the country, our kids are 10 and 8, and our days are full of school and pets and no wiping of other people’s bottoms. So many changes.

magic elves 2009, part 4 – Coda

Full set of photos here.

Coda

elves09 part 4

Normally, magic elves go back to the North Pole with Santa on Christmas Eve. But we got special permission to keep ours with us a little longer, since Auntie J was coming just after Christmas for a visit and we wanted to introduce them.

So the mischief lasted a little longer. A “snowdrift” of styrofoam, reading a book about flower fairies on top of the tallest bookshelf, setting up the Star Wars and Littlest Pet Shop figures in the kids’ room…. On the last day the elves were thoughtful enough to bring a couple of giant Christmas pencils and set up the homeschool books for the day. They also left notes requesting that the kids pack up their clothes and items for their return trip.

Altogether, it was a wonderful visit. We are definitely inviting the elves back again (in fact, the kids want to invite a couple more to join in as well), though they likely won’t stay quite as long this time.

magic elves 2009, part 3 – Christmas Eve

Larger photos in the set here.

Christmas Eve

elves09 part 3

Ever since Halloween I hadn’t been able to find my little point and shoot camera. APPARENTLY the elves found it, because the next morning we found an interesting mini-tripod setup in front of the tree, and a ton of photos on the camera. Peeking into the frig, out of the microwave, eating their crackers, climbing in the tree, cuddling their kids – and even a couple on Santa’s boots. Clearly a busy evening – and what else would you expect for elves on Christmas Eve?

hope

Three Lights in the Dark - Hope
photo by madison.murphy, through flickr

“Hope for the moment. There are times when it is hard to believe in the future, when we are temporarily just not brave enough. When this happens, concentrate on the present. Cultivate le petit bonheaur (the little happiness) until courage returns. Look forward to the beauty of the next moment, the next hour, the promise of a good meal, sleep, a book, a movie, the likelihood that tonight the stars will shine. Sink roots into the present until the strength grows to think about tomorrow.” Ardis Whitman

magic elves 2009, part 2 – Adventures

Check out these photos larger: the set is here.

Adventures

elves09 part 2
The next morning when we woke up the elves were no longer in their bed. We’d been warned there would probably be mischief, hide and seek, and other unexpected adventures (some people call them elf-capades, but that sounds a little too much like an ice dancing show for me). But then – we opened the frig, and there they were! I guess they missed the cold.

Most days the elves’ main activity was hide and seek. We made them some clothes – pajamas shown here. Some of their other adventures included trying to untangle Christmas lights, stacking up all the Christmas movies (and bringing a new one – Elf), playing on the swing set and the tricycle outside, and getting out all the playdough in the house. They hid in cupboards and the silverware drawer. They started up the computer and were found playing Lego Star Wars one morning, found some tiny playing cards that I had as a child and were interrupted in the middle of a card game.

My son’s birthday is in early December, and so one day they brought a gift – toy reindeer (they also got out our claymation Rudolph dvd set – it stays in the Christmas decor box the rest of the year), and one day they brought little Christmas themed coloring books and crayons. Another morning they were waiting expectantly with a gingerbread house kit, and once they took all the cookie making supplies and stacked them on the stool in the middle of the kitchen (with themselves in the plastic bowl at the top of the tower).

The best thing was probably the night that my daughter’s friend slept over and brought HER elf Ginger with her – the next morning they were nowhere to be found. But what was that? Our car was all turned around and askew – NOT how we left it the night before. When we went out to see what was up we discovered a team effort – Ginger steering, Priscilla buckled in (no doubt navigating) and Mickey working the gas petal. (And boy, you should’ve seen the half-delighted, half-freaked look on the kids’ faces.) I told the elves that next time they took the car out they should really bring back pizza.

magic elves 2009, part 1 – Arrival


First of all, if you’d like to see these photos larger, the set is here.

So as I mentioned before, I first saw these elf shenanigans on Marci Lambert’s Make Art Every Day blog. And it looked awesome. I checked out Elf Magic and ordered a couple of tickets for two elves to come visit us last year.

Arrival

elves09 part 1
Our elves arrived just after Thanksgiving as we were putting up Christmas decorations – they appeared on the doorstep in a basket with helium balloons. They brought magic snowflakes and elf sacks, as promised when I got their tickets. They also brought a little suitcase with some extra clothing, passports, and files on each of the kids, complete with a tiny elf-drawn sketch, likes and dislikes, and naughty/nice status. Also – blank paper to add notes as the month wore on. Which they did, weekly or so.

Their names were Priscilla Snowflake and Mickey McFrost. Judging by her loopy handwriting and abundant use of exclamation points, Priscilla was very excited about her visit. It turned out that Mickey was more cautious, having had a bad experience the year before while visiting a boy who was on the Naughty List.

Anyway, we tucked them into bed (used a shallow Amazon box with some of the airfilled packing material as a mattress; we had a candy-cane striped fleece blanket as well which I later sewed into two sleeping bags), sprinkled them with the magic snowflakes as instructed, and set out some crackers and water (their favorite snack – the crackers are crunchy like North Pole snow and the cold water is like melted snowflakes). As you can see, when we awoke the next morning they had also gotten into a leftover muffin…

thanks giving

I would maintain that thanks are the highest form of thought, and that gratitude is happiness doubled by wonder. – G.K. Chesterton

art of all kinds, books, church, dancing,
ears, friends, grandparents,
husband, indoor plumbing, joy, kids,
legs, music, new house, oxygen, pumpkin pie,
quilts from my grandmother, random anecdotes overheard, siblings,
taking pictures, umbrellas with cheerful designs, van,
warm wool sweater, extended family,
yellow, zing

You?

Pikachu hat

Remember this Pokemon?

10 30 10 051

We found the Pikachu suit at Goodwill. Both my kids being Pokemon fans, there was some discussion over who would get to wear it, but my daughter conceded in favor of her former idea, a blue fairy, courtesy of her dance recital costume and some wings and a wand from Walmart. (Exactly the right color too!)

Meanwhile we needed to finish out the Pikachu costume, so I bought some fleece in the appropriate colors and started googling.

Shockingly, I didn’t find an actual pattern specifically for a Pikachu hat (seriously, I was actually a little surprised). But there are plenty of tutorials out there for fleece hats, and even hats with ears added. I mostly used this one and a couple of reference pictures.

Here’s the finished product:

10 30 10 061
10 30 10 064

When I do it again (my daughter is begging for a fox hat), I will probably alter the height of the triangles a little – my kids and I have freakishly large heads, I fear. Also, be sure to cut the band the right way – I cut mine along the non-stretch and had to pick it out and replace it. Whoops.

belated Halloween ’10

10 30 10 111

All of us – plus an aunt and a friend.

(I am a pioneer, in case you can’t tell from the folded back bonnet.)


10 30 10 016

10 30 10 038Blue fairy.

10 30 10 072Ash and Pikachu!

10 30 10 051