Category Archives: scrapbooking

everyday April album

So, I love Stacy Julian’s book The Big Picture. Totally recommend it. Way back in April of 2007, I decided to try her “May Everyday” album project. (Except, well, in April.) I can’t seem to find a link to an example of her album online, or a similar one, though this blog post of hers has a similar concept, though the album is quite different.

April 2007. Do you know that was six years ago? It was also my 6th wedding anniversary that year. I’m planning to do this project again this April, 6×12 album again, using some of the Olive core kit from Project Life, as well as some of Becky Higgins’ page protectors. In theory, I do Project Life as well. (I say “in theory” because I don’t print photos at home, and so I end up having major “catch up” sessions most of the time. I wanted to slide photos in a bit more consistently this year but since we were away from home in January, I’m still not quite in the groove.) But I usually have a more weekly/monthly focus for that, where this project lets me get very intense and daily for just a manageable month.

Anyhow, I thought first I would share the old album with you…

photo
The sneak peak (not that sneaky, since it’s translucent) of the front.

Now, back in April of 2007, I didn’t have any 6×12 page protectors, or a 6×12 album either. But I did have a giant box of 12×12 page protectors from Costco. At the time, rather than order something special, I just took some of those and sewed them to the right size, punching the holes myself. As you can see here:
photo

I also decided to rig my own album. At the time, my husband was working at a company that manufactured poly-plastic folders, so I had him bring me a frost blue legal size one and I made my own cover out of it, with binder rings and ribbon and all.
photo

I started out with some super crappy (and cheap!) three-up divided page protectors from Michaels, but those quickly began to tear at the seams, so I switched them out for this type from Exposures Online, called 4×6″ Slim Pages, which are very nice, very sturdy.

photo
So, here’s the cover page, which I just recently finished. (It was complete except for the A – I’ve been looking forever for a large foam stamp that I know I have around somewhere… still haven’t found it so I used a printout instead.) I used papers from a matching kit I had (Chatterbox? who knows, this was six years ago!), and a general motif of paper strips, doodles and little flower brads.

photo
This page shows the basic format of the album (the same as Stacy J.’s): one side a 6×12 page with the date, the other a 3-up page protector with (generally) two photos and one spot for memorabilia of some kind. I will admit that though I set up all the pages in advance as SJ recommends, I didn’t always write on them on the day. Often I just took notes in my spiral notebook and then wrote on the page later. Perfectionism, what? But hey, it worked, and the simple format means that I did eventually finish it, though it was probably a few months later.

photo
Sometimes the memorabilia was actual memorabilia – like this program from Easter Sunday at church, or the ice cream packaging in the last picture. Sometimes it was receipts – and several times it was something I printed from online, like little sticker-type print outs of the Power Puff Girls and Mojo Jojo, because we were into that show at the time.

Some other things I included:


  • a map of our neighborhood, including Google Street View (partly because our car was on it)
  • a list of our favorite restaurants
  • a list of websites that I visit frequently
  • screenshot of our family blog
  • tags from the kids’ clothes
  • the magazines I was getting at the time – I cut the little pictures of them off the renewal cards and glued them onto a 4×6
  • a favorite poem at the time
  • the answers to an interview/quiz that I asked each family member (well, each one who could talk at the time). I plan to repeat those this year.
  • sometimes, just a third photo

Lots of variation – but I plan to recreate several of those things in the album this year, for the contrast.

photo
Hey look, those were the most awesome dollar store kites ever – a snap to fly.

photo
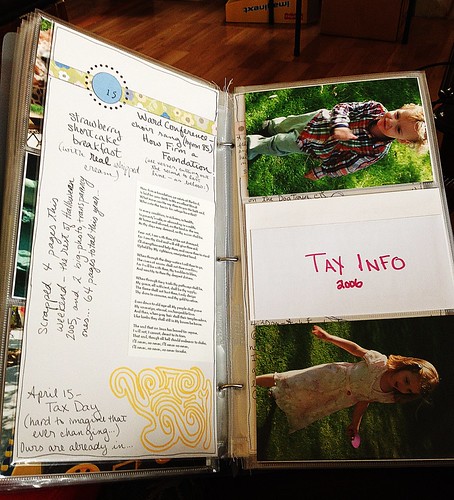
Tax info included on April 15th, of course. One of my favorite things in the album (not shown) is a printed pie chart of our spending that month – I was keeping track of everything in Quicken at the time. (Now I use YNAB – You Need A Budget – and I LOVE IT SO MUCH. But that’s a topic for another post.) I just love seeing what we spent our money on back then, at least some of it – how much our rent and utilities were, groceries, gas, how much I spent on paper vs. digital scrapbook supplies, etc. Really cool.

photo
The final page, with just a quote.

Normal day, let me be aware of the treasure you are. Let me learn from you, love you, bless you before you depart. Let me not pass you by in quest of some rare and perfect tomorrow. Let me hold you while I may, for it may not always be so. One day I shall dig my nails into the earth, or bury my face in the pillow, or stretch myself taut, or raise my hands to the sky and want, more than all the world, your return.
– Mary Jean Iron

People, I really love this album. It is so, so much fun to look through now. I flip the pages and just marvel at the differences between then and now – a couple of pages I traced my kids’ hands on, which I am totally going to do again this year, even if ten and eight seem a little old for hand tracing. Back then we were living in a little apartment in the city, we were in the midst of potty-training, we had a 4 and 2 year old. Now – we own a house for the first time, in the country, our kids are 10 and 8, and our days are full of school and pets and no wiping of other people’s bottoms. So many changes.

advent calendar

advent calendar

I got this Karen Foster countdown calendar to make a Christmas advent/countdown calendar. (Oddly, you can buy it at toysrus.com, as well as scrapbook.com and the place I actually got it. Which was… I don’t remember. Somewhere online.) The black number stickers were included. The drawers are about 1.5″ square – very little – and it was tricky to cover them with paper, even though the back of the packaging has a template to use.

The trick (I use the term loosely) that seemed to work for me was to use a 1.5″ square punch (I used my Creative Memories one) to cut a square, then trim two edges off it – just a tiny bit, to make it about 1 and 3/8ths square (I wanted a small border of white around the edges of mine). Then I used the template to trace the notch onto the back of my square – but didn’t cut on that line (I couldn’t get it nice and smooth). Instead I used my smaller circle Creative Memories punch (the one with the 1″ and 3/4″ circles) and, using the 3/4″ circle, upside down (so I could see the paper), held the square inside and cut the notch with that. Worked like a charm. So that’s my tip.

advent calendar drawer

I like how it came out. It’s filled withe hershey kisses and ready. If I were doing it again, I might make more boxes with just the circle of paper and the number. Cuz I like it to be simple. But I like it.

recovery

Yes, I got my backup in the mail (on a portable hard drive, actually) and am working on getting my computer life back in order.

[Imagine there is a photo here… if I were to the point of uploading photos again yet. Soon, soon.]

So far I am making progress… there is definitely some finagling to be done, and I will be trying to get some stuff off of my old drive (or else crying to a couple of digi supply shops to reset my purchase download links for me – not ALL, just a few recent ones). There may be some stuff that I’m missing and don’t realize. But so far (I say EXTREMELY tentatively) it looks like I haven’t lost any photos to speak of. Which is DEFINITELY a HUGE relief. Beyond huge.

Tomorrow, if most other things are straightened out, I will start transferring last month’s photos (which luckily are safe on camera cards) back onto my new portable hard drive, and so on. Then I will immediately back it up to the other hard drive (a whole terabyte! woohoo!) that we got just for backup. Not a good month for ye olde budget.

THEN you can see Halloween photos! Aren’t you just thrilled?! Perhaps I will do nothing but photos the rest of the month in celebration! Hmm. Unlikely.

What definitely WILL be happening a lot the rest of this month is digiscrapping. There’s nothing like not being able to do something to make you crave doing it. Not to mention – I’ve been trying to make a few little scrapbook things to sell at a coming craft fair – mini albums, tiny albums for ornaments, gratitude and Christmas albums, etc. (Making extensive use of my MA-SHEEN – which is what I call the Bind-It-All I got for my birthday.) Plus trying to start getting my Daily December album together (ala Ali Edwards).

And let me tell you – it is PaperScrapping: 2, Me: 0. Unless you’re counting by damage done, in which case the score is the other way around entirely. I have broken not one, but TWO heavy duty scrapbooking tools so far this weekend – my Making Memories trimmer (which now shreds and mauls paper instead of cutting it nice ‘n’ straight, though to be honest, it had issues with that before; but at least it didn’t CHEW UP the paper then), and my Round It All, which is a heavy-duty corner rounder. A piece of transparency got stuck in it and it was a bad scene all around. Thankfully, my husband was able to (eventually) fix the latter, but the trimmer may be a hopeless case.

I feel rather defeated by the paper (oh, is THIS why I like digi now?), though, again in the interests of full disclosure, it’s less because of struggles with tools and more because I have no place for it all. At present I’m spread out over most of the couch and my kids’ folding table. I don’t know where to find ANYTHING, much of it is still in boxes anyway, and the general frustration is just making me nuts. Though, evidently, not quite nuts enough (YET) to make me sell all my paper stuff, nor to curb the desire to work with actual paper which has been growing over the past few months. (Ever since I got most of my photos scanned – I think having a digital copy of them makes me feel free to actually scrap them now.)

Desire + (Intense Frustration with the Lack of Accessibility)^2 definitely = Teh Crazy. As if I need help with that….

Well, it’s past time for bed, so I’ll let the computer do its recovery thang and will see you tomorrow. Poll coming soon!

Update: 
I contacted Making Memories and they sent me a replacement trimmer, no problem. Very awesome.

Project: encyclopedia of my childhood

Cathy Zielske is teaching an online class at Big Picture Scrapbooking – it’s called Me: The Abridged Version (MeTAV for short), but is essentially a slightly revamped, online version of the EOL class she used to teach at CKU. (Too many letters! CKU = Creating Keepsakes University, a scrapbooking conference thing. EOL = Encyclopedia of an Ordinary Life, inspired by the book by Amy Krouse Rosenthal. Yes, I have mentioned it before. Love it, love it, love it. So much in fact that I now own a hardcover copy as well as a paperback. And I may have to get an extra paperback to loan out. We’ll see.)

The concept of doing an EOL/MeTAV album isn’t hard to put together, but I’m stoked for the class experience and the deadlines – I think I signed up for the MeTAV class the first day. (I tried back a year or so ago to follow along with some people who were making EOL albums on Digishoptalk, but never got much past making a list of words.) This form of organizing your memories and telling your stories is so deeply appealing to me, I’m very excited to actually get it into album form.

In my mind, the MeTAV album will be a kind of snapshot of my current life, at just-about-to-be-30. I’ll probably do it again, part two, in another ten years or so. (And I wish I could find a place I could make a proper bound book of my 8.5×11″ pages – portrait, not landscape. What’s the deal, Shutterfly? and just about every other place I’ve checked. Why can we have 11×8.5 but not vice versa??) I do plan to do all the pages digital – Cathy is providing templates, and I found the perfect kit for me to use (Refreshing it’s called).

But I also have a lot of memories I want to capture from my childhood, more than would comfortably fit into the MeTAV album, which is supposed to be limited in size and (maybe?) scope. So I thought, I’d really like to do an EOL album focused just on my childhood. Plus I’m always thinking of additional details or memories I want to include, so I need it to be expandable. (Cathy’s designs are awesome, but because they have left and right facing pages it would be hard to add to after the fact.)

This is what I came up with:

eol-title web

My album is an 8.5×11 binder, an American Crafts corduroy binder, actually, much like the MeTAV class one, though green. I plan to include both digi pages, and paper pages (scanning tons of photos actually makes me want to do some paper scrapping; must be because I feel safe that there’s a back-up digital copy of the pictures). I’ve decided, rather than fret about using the exact same papers, or worrying about trying to get the paper and digi match, I will simply make each page/entry separate, but each more or less monochromatic, with plenty of white and kraft paper thrown into the mix. The section pages and the title and last page (made in paper; the images on this page are the sample ones I made to help me figure out which color should go where – but see, a rainbow of colors plus kraft and white as neutrals) should help tie it all together. I’ll file things alphabetically, but only by first letter, not worry much about true alphabetization. The focus will definitely be on the words, more than the photos, but I’ll probably use 2 or so photos per layout/entry (or stickers/elements occasionally for photo-less entries), and I’ll frequently use similar page layouts, even though the colors and paper will change.

I also plan to throw in a few sheets of baseball card page protectors; they hold ATC sized cards and some of the smaller memories I’ll write on cards, decorate, and insert in those.

Sorry, no real examples to show you yet, other than this title and section page. I’ll link to it when I’ve finished some – right now I’ve been collecting words, memories, and starting to type out some of the entries. I will probably have to do an entirely separate album for “family dialect” though.

I love this format so much. It helps me focus on the stories, which to me, are the absolute best part.

eol-section

happy thanksgiving

It’s really time for a nap. I haven’t decided yet whether I’ll be attempting any shopping at all tomorrow. Maybe a little on Amazon…

I really like this idea here of making a gratitude book and writing a page a year. I think I may poke around among my albums and see if I have one that would work.

Five things I’m grateful for:

  1. family
  2. friends
  3. hot running water
  4. books and music
  5. faith

baby book planning

So I’m just about ready to start making my son’s baby book. My daughter’s is done, all except a bit of journaling, the last page, and that @#$&^*! ultrasound page, if I can ever find those darn pictures… (I had them, then lost them, then found them again, and now they’re lost again. I’m hoping it will come around again soon so I can put them in her book.) But anyway, it’s done – an 8×8 book of the highlights of her first year: milestones, firsts, all that sort of thing. (Still must scan all the pages.) And now I need to make one for my boy.

Digital of course. Just about everything I do is digital lately. But I am going to get the pages printed separately and put them into a regular album (as opposed to getting it done as a hardbound book, which I thought about) – mostly because I want to use some of the same, special page protectors that I used in my daughter’s, one that opens like a door for the title page, and a couple that open opposite each other to make a four page spread – for the “see how you grow” type layout, with photos each month from newborn to one year. Also so I can include some memorabilia – first haircut, hospital bracelet, etc.

I’ve just about got all my info together for it. Now I’m busy obsessing about the paper/digital kit I want to use. I had one, but it doesn’t have enough blue, and then I got the album, and I sort of want it to go along – it’s pale blue, with some stitching, red ribbon and an extended spine that is patterned – polka dots with red, light blue, dark blue, lime green and orange, on off-white. The problem is that most baby boy kits I find tend to stick to pale blue; they tend not to include red. Hmph. Let me show you some I like (I may end up using a combination… we’ll see):

Love this one, red, blue, green, orange, stars.

More baby-ish. I really love the animal stickers in this. But no red. 😦

This one has cool cars – but I mostly want it for that polka dot paper – looks almost just like the album I have.

This is just cute – love the puppy. And the snail! Dotted paper is perfect, just needs red. Sigh. Why can’t I just find the perfect kit somewhere?? What I should really do is just look through all my stuff and make my own kit from things I already have. Hmph.

Other options (not from SSD; I’m sure you’ve guessed this is why I’m trying to get the discount there this month, especially if I’m going to use more than one kit…): I like the red and pale blue color scheme on this kit

Still thinking… but I want to get started soon.

digiscrapping notice

Until December 7th (and maybe a while after?), there is an amazing huge digital Christmas mega kit for free at Amy W.’s site. (Well, you can find the links from there.) The kit is called “One Night in Bethlehem.” My personal favorite portion of it (well, so far, I haven’t even gotten to all the links yet) is the nativity set here at JanniScrap Designs.

(So much lovely holiday stuff. I will never use it all (but hey, at least it doesn’t clutter the house…) — besides all the free stuff, I have some from Katie the Scrapbook Lady, Digishoptalk’s kit of the month, this one from Lisa Whitney on Scrapartist, this amazing Homespun Kit that I couldn’t resist, and Noel from Songbird Avenue, which is a charity kit and TOTALLY exactly what I needed for last year’s stuff (matches the one paper layout I’ve already done) so I’m really not sorry a bit. Must nix any more Christmas stuff… must….)

ETA: Okay, here’s a couple of Christmas 06 layouts I’ve done with the Noel kit, just to show some of it off. (Those stamps are in the kit, but actually have 2007 on them; I had to alter them after I realized that last year’s Christmas was, duh, 2006.) Do go check out the full kit, it’s beautiful, and benefits the Make-a-Wish Foundation.

xmas06madness


Two pagers are kind of a pain digitally. (For multiple reasons, not least the enormous file size. This one, as a .psd in layers, is 167MB, urgh.) Ah well. I wanted to this panorama photo of the chaos.
Supplies:
Noel kit, Songbird Avenue
grid paper: freebie from Simply Clean Digi Scraps, Melany Violette
fonts: AL Worn Machine, Cut-n-Paste

xmas06camera

Supplies:
Noel kit, Songbird Avenue
velvet ribbons, frame: ScrapArtist.com
filmstrip: Scrap Girls freebie
torn paper template: my own design, using Anna Aspnes’s paper tears
fonts: CK Holiday Spirit, AL Worn Machine

digi scrapping organization

(I just can’t get away from talking about the digiscrapping. Oh well.)

As in paper scrapbooking, people wonder about how to keep all those luscious digital supplies in order. Some people talk about copying all their papers into one file, so as to have all their papers together, and so on. The very thought makes me cringe – first of all, I have SO MANY FILES. And how do you look at them all? Or figure out where you got them from? Do you keep multiple copies of the same item? If so, you’ll probably have space issues all too soon. What about keeping kits together so that you can take advantage of the nice coordinated products and all?

My method is this (I use the amazing Photoshop Elements Organizer, just as I do for photos):

First I download a freebie or bought item, then I move it from my desktop to the appropriate folder. I have a folder on my external hard drive called digiscrap supplies, and within that folder various others, named after the places that I get my supplies (occasionally after the designer herself); so for example, DesignerDigital, OScraps, Shabby Princess, Katie the SBLady, Scrap Artist, 2peas and so on. (Freebies always go in the main folder; if I paid for it, it goes in a “paid” folder within the location folder. I like to keep my paid stuff somewhat separate.) I put the zip file into the designated folder, and then unzip it. After I’m done unzipping my files, I move the zip files to their own folder: “unzipped” and “unzipped paid.” Less clutter. I don’t move any of the actual files or anything (except if there’s an .abr brush file, or a pattern file, I do copy that and put it in a folder I have specified for my PSE brushes – but I leave the original in the folder, just as it unzipped). I usually unzip things one kit at a time, unless I have lots of small individual freebies that don’t go with anything in particular.

PSE Collections screenshotNext I go to my PSE Organizer. Under normal circumstances, it automatically detects that there are new files and asks if I want to import them, so I just click yes. Every now and then for some reason it doesn’t do this, and I have to choose Get Files from Files and Folders and do it manually — it’s not too bad though, because there is a box to check for “get files from subfolders” so it’ll grab them all at once rather than making me go back and do it again and again from each folder. So it pulls up thumbnails of the files – tip! press Ctrl-A instead of going through and checking each individual box. I won’t tell you how long it took me to figure that out. Ahem.

It then imports them, and right away I begin filing them. I first put them in a collection. My collections are named by designer/shop, and then kits or categories within that. So for example, Shabby Princess collection group, and under that collections with the names of the kits: Festival, Two Soon, etc. I sometimes have a collection called “LDD freebies” and “LDD paid other” for things that I want in a collection, but that aren’t part of a large kit.

Here at the left is a screen shot of my Collections bar, so you can see some of the different categories that I mean. My general rule for this (as with most of my scrapbook organizing) is: where would I look for it? How would I find it? In digi, I tend to want my kits together, so that I can easily look through them and use them for whole albums — also so that I can scan through them for color schemes and so on. However, sometimes I want to break out of the kit mentality, and try matching up things myself, or I want to find a particular item – a ribbon, or brad, or photo corner or something. That’s where the tag part of the system comes in.

Next I use tags to file them by item type. Here’s my list of tags, all under category Scrap Digi and subcategory Digi Scrap Elements:

  • alphabets
  • brads/buttons
  • brushes, overlays
  • embellish (hearts, stars, anything that defies other categorization)
  • flowers
  • metals, inking
  • paper
  • plopper, templates
  • ribbon, stitching
  • swatch cards (for all the preview images, very nice for abbreviated browsing)
  • tags, frames, photo corners
  • theme (clear themes like Christmas, Halloween, etc.)
  • to file (I use this mostly for TOU images and other such extras)
  • words

I also have a subcategory for color tags – ROYGBIV – but I’m way behind on tagging things with those. In a way it’s sort of silly to have them, since you can recolor things so easily, but oh well. And finally I also have a tag called Paid Good Money, so that I remember to use the ones I actually paid for as often as possible. It’s nice that I can choose to exclude the entire Scrap Digi category when I want to see how many photos I have, not counting all the digi supplies (which easily add several thousand files to my PSE catalog).

I use the Stack Photos feature to group alphabets together – it makes them more manageable when I’m looking through the Organizer normally, not having to scroll through 26 (well, more with numbers) individual letter files all the time — when you pull up the collection the alphabet is in they will be visible unstacked (and you can always do that manually in the regular part of the organizer, too).

So that’s my system for digi supplies. This way I always know where I got something (for the purpose of crediting, etc.) and can also just look for supplies by coordinated kit, or simply by what it is (let’s see, I really need a flower here…). It’s been working great so far. One more note: when I’m doing a coordinated album (like the birthday one I did for my dad – hm, I should post that – or the family reunion one I’m in the midst of, or the baby album I need to do for my boy) I decide which kit (and extra items) I want to stick with for it, then I either make an additional tag (“Family Reunion Album”) or collection, and apply it to all those files, as well as the photos I want to include. It’s like my “supply bag,” keeping all the supplies for that project together, and then when I’m working on it I just click that tag (or collection) and it pulls up everything I need for it, and from there I choose my photos and supplies for any given page and just open them into the Editor.

Then later I delete the temporary tag or collection and it is removed from all those photos and files. At least, as far as the Organizer goes it does. However, I recently read that while PSE applies tags to the files, right in the metadata, it does not actually remove them from the metadata when you delete the tag, or remove it from a photo. So I think I’ll probably start using a collection instead of a tag for this “supply bag” purpose. One other reason to do this – when I click on a tag it takes a while to sort through and load just those photos; loading a collection is much faster.

So there you are. I’m sure you could institute a similar system with any program that lets you use tags and so on – Picasa, ACDSee (I think), or others. I just hope that someday in the distant future when I actually get real live Photoshop, that it plays nicely with the PSE Organizer. Because I would be lost without this thing.

digiscrapping again

Geez louise, I gotta post earlier in the day.

The talented Smocklady sent me a question about digital scrapbooking. So here we go, I’ll share a few tips, and reasons why I am so into digiscrapping right now.

Tip 1: The thing that has helped me the most in digital scrapbooking is to learn my program a little better. (In my case, Photoshop Elements 3.0.) In all honesty, it really helps to have Photoshop or Elements because so many people do, there are a LOT of tutorials out there for them, lots of online help available. (Scrapgirls has some good free articles, for example.)

Tip 2: Drop shadows are extremely important, especially if you’re like me and you like to make your pages look similar to paper in many respects. When I found this tutorial that showed me how to adjust my drop shadow from PSE’s ridiculously huge default of 21 pixels, to something far more realistic, like oh, say, 2 or 3 for flat paper, it made a huge HUGE difference.

Tip 3: Brighten your photos if you need to. Digital cameras (and scans of regular photos for that matter) tend to be dark, and they’ll look so much better with your pretty digital papers and eventually printed if you brighten them up a bit. I can’t speak for other programs, but if you have Elements (or Photoshop itself), you can use adjustment layers while you’re working on the layout itself, and it’s great. With an adjustment layer, you can alter the levels, color, etc, of each photo on your layout individually, and after adding it to the layout; you can also alter it in the middle of things if you suddenly decide you want to turn a photo black and white or something. Just try them out — they’re great. (Oh, by the way, for those who do use Elements, here’s a link to a free set of actions for PSE that let you adjust curves. Read the linked page for specifics.)

I listed some other tips in this former entry.

A few things I love about digiscrapping:

  1. The ease of resizing photos, or converting to black and white if I so desire, and not having to get them developed first. I’m way behind in my printing schedule, and so most of the ones I just have hanging around are older pics. That’s fine, but sometimes I want to do something more recent, and I have improved SO much in my photography, that normally if I want to just make something pretty, with a nice photo? That means using a much more recent picture.
  2. I love being able to match colors to things in my photos, or in a piece of digital paper I’m using. Not to mention being able to use the Hue/Saturation sliders to change the color of my digital supplies if I want to.
  3. So little mess. Easy to save and put away for the moment (well, in theory, if I didn’t have obsessive tendencies). And so easy to take to crops. I love the socialization and dedicated time at crops, but I hate hate hate packing my paper supplies and tools, especially if I don’t have a current, very specific project going, where I’m using limited supplies and I have them all together. Even having to haul my whole desktop along, it is easier and faster and much less stressful for me than packing half the doggone room into crates and bags, that weigh a ton, “in case” I need something. Just imagine how easy it’ll be when I have a laptop and just have to plug it in and open it up… oh, did I just salivate on my keyboard? Whoops.
  4. The undo button. Brushes. Making templates (I find this really fun, for some reason). Being able to type out a nice long piece of journaling without futzing with my printer and all. How easy it is to recreate the simple style of paper layout that I like so much — like many Cathy Zielske and Becky Higgins layouts, for example.
  5. All the beautiful free supplies. Also lovely ones to buy, most relatively inexpensive (especially considering that you can reuse them as much as you want). But honestly, so much awesome free stuff. You could go for so long (possibly forever) on just the free stuff. And regardless, you can get it all from your computer RIGHT AWAY, as soon as you download it. Woohoo!

And finally, for your downloading pleasure, these are my current favorite places for digital scrapbook supplies.

Oscraps.com – Has some fabulous freebies, and lots of variety.

ShabbyPrincess and her Shabby Shoppe – Shabby Princess has the most beautiful free kits, just gorgeous.

Designer Digitals – good deals every week, some freebies, and basically, I just can’t get enough of Katie Pertiet’s designs

Scrap Artist has beautiful stuff. I also like Little Dreamer Designs. Both of these sites offer freebies as well, and LDD has regular freebies on their blog.

Digi Shop Talk has a very good deal of $25 for a year’s worth of kits, one per month. I like what I’ve seen of their message boards.

P.S. Costco does 8×8 and 12×12 prints now. Can’t wait to try them.

binder album

This is not a brand new revelation, but here’s a totally awesome idea. I love the binder, and the idea of keeping all the different size layouts together.

More later, must pack.